Pexi renders your After Effects project to MP4 on a dedicated render machine. You upload a collected project, pick a composition and press Render all. You never have to open After Effects to render.
Connect a feed and Pexi renders one video per feed row. Each row fills text, images, video and audio layers in your template. One template can produce hundreds of personalised videos, for example one per product, store or offer.
You do the first four steps. Pexi does the rest: it sends one job per feed row to a render machine running After Effects, which fills your dynamic layers and renders an MP4.
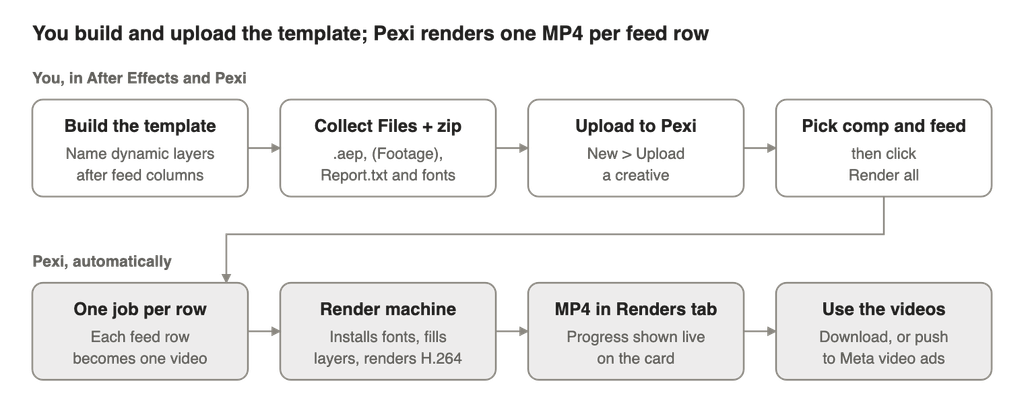
The template is the only thing you maintain. To change the content, update the feed and render again.
Set up the final look in After Effects, because Pexi renders the composition exactly as you built it.
Main 1080x1920. You select it by name later.# in the .aep filename. The render machine removes it, so keep the filename to letters, numbers, spaces, hyphens and underscores..psd, .sketch and .xd. Any layer that uses one of these files renders as missing footage..ttf or .otf files you use in the project folder. The render machine installs every font it finds in the package before it renders. Missing fonts fall back to a default font.Report.txt and a (Footage) folder. Pexi uses all three:
(Footage) folder is the only footage folder sent to the render machine. Footage stored anywhere else is not sent.Report.txt lists the compositions. Pexi reads it to fill the composition dropdown.(Footage) inside it. If you put files at the zip root next to a folder, Pexi ignores the root files. Your .aep may then go missing.The upload limit is 300 MB per file.
To make a layer dynamic, give it the same name as a feed column. Pexi needs no prefixes, tags or scripts. When it renders a feed row, Pexi finds each layer named after a column and fills it with that row's value.
Example feed row
| FEED_ID | TITLE | PRICE | PRODUCT_IMAGE |
| 42 | Summer sale | 19,99 | http://example.com/shoe.png |
In this example, the composition needs a text layer named title, a text layer named price, a footage layer named product_image and an audio layer named voiceover.
How Pexi uses each value
| Feed value | What Pexi does | Layer type in AE |
|---|---|---|
| Plain text | Replaces the Source Text, keeping font, size, colour and animation | Text layer |
| A link ending in .jpg, .jpeg, .png, .gif, .webp or .svg | Replaces the layer's footage with the image | Image or placeholder footage layer |
| A link ending in .mp4, .mov, .avi, .webm or .mkv | Replaces the layer's footage with the video | Video footage layer |
| A link ending in .mp3, .wav, .aac, .ogg or .m4a | Replaces the layer's audio | Audio layer |
| Empty | Leaves the layer as designed in AE |
Tips for dynamic layers
Title will not match title.feed_id or id column. You can choose another column under Feed key. The ID column is never sent to a layer.To make sure the template is complete, check that every dynamic layer in your composition has a matching feed column. Other columns in the feed are ignored, because no layer has their name.
You upload an After Effects project the same way as any other creative.
1080x1920.Pexi unpacks the zip and looks for an .aep file. If it finds one, an After Effects render card appears on the creative's page. If the card is missing, Pexi found no .aep. Check how the zip is structured (see Step 1, point 8).
If you see 413 Error: File is too big., the zip is over 300 MB.
You configure the render on the After Effects render card on the creative's page.
Report.txt, or else from the .aep itself. If the list stays empty, type the name exactly as it appears in AE, for example Main Comp 1080x1080.feed_id. If you leave it empty, Pexi uses feed_id or id.?filter_by=active.Pexi sends one render job per feed row to the render machine. While it renders, the card shows a progress ring and a counter such as “12 of 40 rendered”. You can leave the page; rendering continues.
When the render is finished, the card shows Render complete and a message such as “Render finished: all 40 video(s) done.”
The videos appear in the Renders tab of the card:
Watch a few renders before you use them, and include the longest and shortest feed values. Pexi has no preview before rendering, so a test render is the quickest way to check text fitting and image cropping. To render only a few test rows, set Feed query params to a filter that returns those rows.
Using the videos in Meta campaigns. A Pexi campaign connected to Meta with the Video type can render and upload the videos automatically, one per feed item. For this to work:
1080x1080, 1080x1350 or 1080x1920.Summer sale 1080x1080 and Summer sale 1080x1920. Pexi then treats them as one ad in several sizes.Pexi takes the thumbnail for each Meta video from a frame near the start of the video. Make sure the first half second already looks good.


 Login
